Preparing Your Soil for a Successful Spring Planting
As the days lengthen and the first hints of warmth return, it’s time to start thinking about preparing your garden for the spring planting season. While it’s tempting to jump straight to sowing seeds, taking the time to properly prepare your soil is arguably the most crucial step for a bountiful harvest. Healthy soil is the foundation of healthy plants. It provides essential nutrients, water, and air, all vital for strong root development and vigorous growth. Investing a little effort in soil preparation now will pay off significantly throughout the growing season.
1. Soil Testing: Know What You’re Working With
Before you add anything to your soil, it’s essential to understand its current condition. A soil test is like a health checkup for your garden. It reveals the pH level (whether your soil is acidic, alkaline, or neutral) and the levels of key nutrients like nitrogen (N), phosphorus (P), and potassium (K), often represented as N-P-K. These nutrients are the building blocks for plant growth.
Why is soil testing important? Different plants thrive in different pH ranges. For example, blueberries love acidic soil, while asparagus prefers a more alkaline environment. Knowing your soil’s pH allows you to amend it appropriately, ensuring your chosen plants can access the nutrients they need. Nutrient deficiencies can lead to stunted growth, poor yields, and increased susceptibility to diseases.
How to do a soil test: You have two main options:
- DIY Kits: These are readily available at garden centers and online. They typically involve mixing a soil sample with a reagent and comparing the resulting color to a chart. While convenient, they may not be as accurate as professional lab tests.
- Professional Lab Testing: This is the most accurate option. Contact your local university extension office or a soil testing laboratory. They will provide instructions on how to collect a representative sample and send it in for analysis. The results will come with detailed recommendations for amendments.
2. Clearing Debris: A Clean Slate
Once you have your soil test results (or while you’re waiting for them), it’s time to clear the planting area. This involves removing any leftover plant material from the previous season, including dead leaves, stems, and roots. Also, remove any rocks, large sticks, or other debris that could interfere with planting or root growth.
This step is important for several reasons:
- Disease Prevention: Decomposing plant matter can harbor diseases and pests that could overwinter and infect your new plants.
- Improved Airflow: Removing debris allows for better air circulation around the soil surface, which helps prevent fungal diseases.
- Easier Planting: A clean planting area makes it easier to sow seeds and transplant seedlings.
3. Amending the Soil: Feeding Your Plants
Based on your soil test results, you’ll likely need to add amendments to improve its fertility and structure. Amendments are materials added to the soil to improve its physical or chemical properties.
- Organic Matter: This is the most important amendment for most soils. Organic matter, such as compost, well-rotted manure, or leaf mold, improves soil structure, drainage, water retention, and nutrient availability. It also feeds beneficial soil microbes, which are essential for healthy plant growth.
- Specific Nutrients: If your soil test indicates deficiencies in specific nutrients (N, P, K), you may need to add fertilizers. Choose fertilizers that are appropriate for your plants and soil type. Organic fertilizers, such as bone meal (for phosphorus) or blood meal (for nitrogen), release nutrients slowly and improve soil health over time. Synthetic fertilizers provide a quick boost of nutrients but don’t offer the same long-term benefits.
- pH Adjustment: If your soil pH is too acidic or too alkaline, you’ll need to adjust it. Lime is used to raise the pH (make it more alkaline), while sulfur or acidic organic matter (like pine needles) can be used to lower the pH (make it more acidic). Follow the recommendations from your soil test carefully, as over-application can be harmful.
Spread the amendments evenly over the soil surface.
4. Tilling or No-Till: Choosing Your Approach
Now you have a choice: to till or not to till? Tilling involves turning over the soil with a tiller or garden fork, while no-till gardening involves leaving the soil undisturbed.
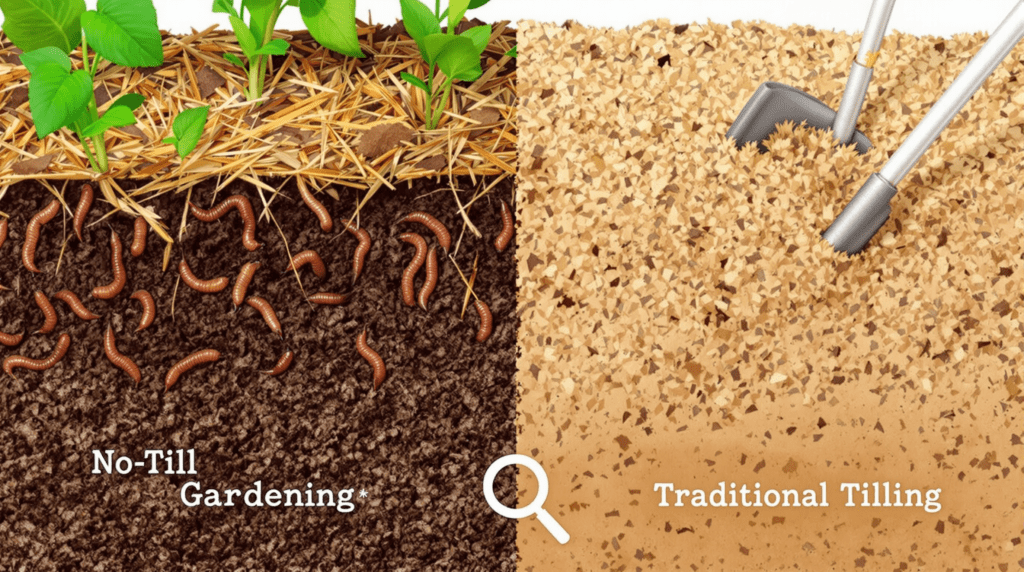
- Tilling:
- Pros: Breaks up compacted soil, incorporates amendments quickly, creates a fine seedbed.
- Cons: Can disrupt soil structure, destroy beneficial soil organisms, bring weed seeds to the surface, and lead to soil erosion.
- No-Till:
- Pros: Improves soil structure over time, preserves beneficial soil organisms, reduces weed growth, conserves soil moisture, and prevents erosion.
- Cons: Can be slower to incorporate amendments initially, may require more careful weed management in the early stages.
For home gardeners and small-scale farmers, the no-till method is increasingly recommended. It’s better for long-term soil health and sustainability. If you choose to till, do so only when necessary and avoid over-tilling. If you choose no-till, you can simply layer the amendments on top of the soil and let them decompose naturally, or you can use a broadfork to gently aerate the soil without inverting it.
Conclusion:
Preparing your soil for spring planting is an investment in the future success of your garden. By testing your soil, clearing debris, amending appropriately, and choosing a tilling or no-till approach, you’re creating the ideal environment for your plants to thrive. Take the time to do it right, and you’ll be rewarded with a healthy, productive garden all season long. Don’t be afraid to experiment and find what works best for your specific soil and plants. Happy gardening!
References:
- PennState Extension – Soil Fertility Testing
- USDA NRCS – No-Till and residue management
- Agriai.live
- Agri AI : Smart Farming Advisor
If you want to learn more about Preparing Your Soil for a Successful Planting, check out Agri AI : Smart Farming Advisor and feel free to ask any questions!
Leave a Reply